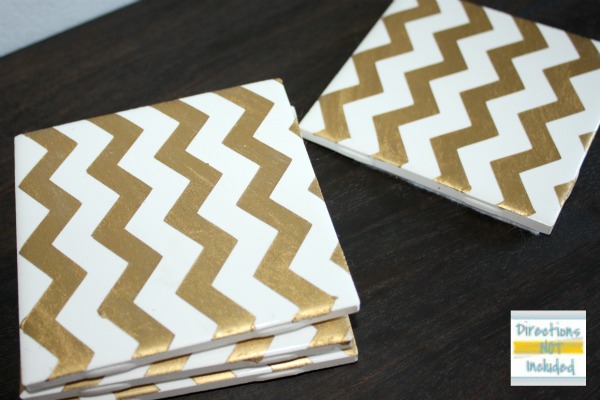
It is no secret that I love using inexpensive tiles as coasters. At 15 cents at the local hardware store, it makes for a perfect medium to getting creative. I had a special bloggy friend in mind when I made these so I went with a metallic chevron pattern. This was a complete experiment and I love they way they came out. I love it when experiments actually work out well.
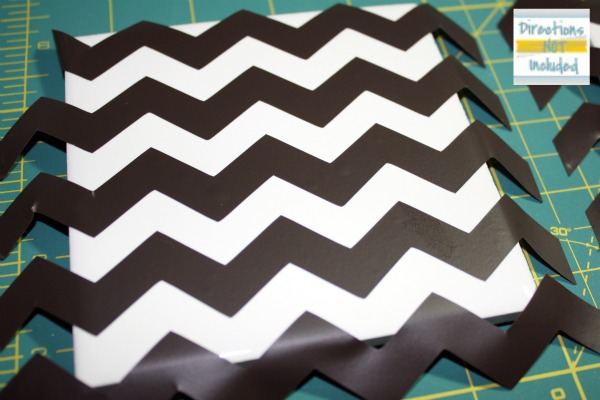
I used the Silhouette to cut out a chevron pattern on vinyl. I did a full 12 X 12 sheet so I could cut it down to cover 4 individual tiles.
I have some scrap vinyl that I’m using for these stencils but I’m sure you can probably use contact paper. I used transfer tape to attach the vinyl onto the plain tiles.
This part is the experiment part. I had a tube of Rub ‘N Buff I bought with no project in mind. I decided to try it on the tile and it worked. Rub it and tap it in without smearing it off and it starts to stick. If you rub it too hard it will come right off so be patient.
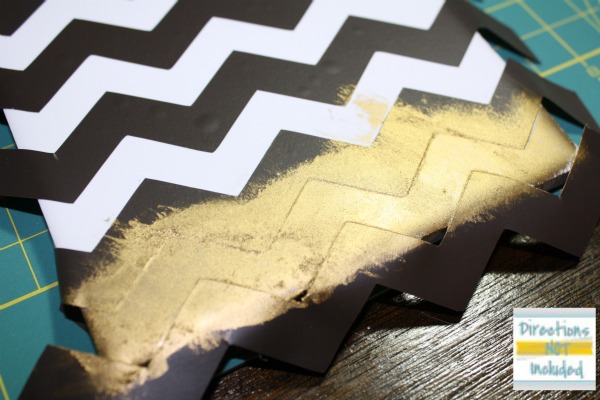
I had seen some messy looking hands recently after using Rub ‘N Buff thanks to Cassie’s post about her nightstands so I decided to adorn some rubber gloves. I’m glad I did.
I took my time and covered all four tiles in the Rub ‘N Buff. I rubbed it in well but made sure to try and not smear it while working on it.
After letting the Rub ‘N Buff to dry off on the tile dry for a bit, I carefully peeled off the vinyl to start revealing the clean white tile.
After finishing off four tiles in the same way, I gave them a quick spray of a clear gloss sealant to make sure the Rub ‘N Buff would not wipe off. It stays on pretty well after it dries but I wanted extra protection since the end use for these tiles would be coasters.
What do you think? I hope my friend likes them. She should be receiving them today if they didn’t get there yesterday.


Have you ever used a new product for a complete experiment? Was it a success or a disaster?
Linking up to my favorite parties here: Link Events

Thanks for following Directions Not Included!
those are fantastic! and i am so glad someone can learn from my mistakes. 😉
I love how those turned out! Great idea and who doesn’t love rub n’ buff?
I definitely need to make something like these for our new family room. Gold + chevron is the perfect mix!
Your friends are going to love them! They are beautiful! I’m still thinking about doing a project with vinyl you make it look so easy!
They’re so pretty! Question: where did you buy your Rub-n-Buff? I asked about it at Joann’s the other day and they looked at me like I had asked where the Swedish meatballs were. 😛
These are lovely! Following along via GFC.
Kelly @ herringbone lane
These are so perfect! I love them love them love them!
Soo cute I just love them. Something else to add to my “to do” list.
Thanks for sharing,, a new follower
Carri
http://www.simplydonewright.blogspot.com
These are gorgeous. I made some coasters that were a complete experiment too, they turned out great! Love it when it works out. The metallic chevron is amazing. I’m pinning this!
Great post! I would love for you to link up at my Linky Party via: http://www.ourdelightfulhome.blogspot.com
Mrs. Delightful
http://www.ourdelightfulhome.blogspot.com
The gold is fabulous! Love this idea.
Love the gold and white chevron!
These are so cute! and I love the golden look! I would love for you to stop by and link up at the Naturally-Nifty Party!
http://www.natural-nester.blogspot.com/2012/02/naturally-nifty-linky-party-4.html
-your newest follower! 🙂
oh my gosh, that looks fab! great idea! and cheap, too!
These are so fun! Visiting from saleenamarie.blogspot.com :]
Just pinned them to my DIY board. I must try this, I seriously need some more coasters.
WOW, this is so FABULOUS!! Thanks for linking up this week 🙂
ooh. i love this gold chevron. so chic!! i would love for you to add this to my new link party… spreading the love. please go check it out if you are interested!
http://lovenotesbylauryn.blogspot.com/search/label/spread%20the%20love%20link%20party
{love} lauryn @ love notes by lauryn
Super cool! I love that you tried new stuff so successfully.:)
Oh my gosh–I totally want to make those. (But in the interest of full disclosure I should tell you that, if some really creative person such as yourself person were to make those and sell them on Etsy, I’d probably buy them there. Just sayin’…)
Nice job!
~Elena
http://acasarella.blogspot.com/
Why in the world can’t you live closer to me so I can feed off of your awesome crafting vibes? Seriously Anna these turned out so fantastic! Thanks for linking these up to this week’s Tutorial Tuesday.
Kari
Newlyweds on a Budget
Super cute! What a fabulous idea.
I love how these came out, Anna. I need to do this.
“I decided to adorn some rubber gloves. I’m glad I did.” Aw. Look at that! The rubber gloves clearly did its purpose. 🙂 And the paint even added a design on your gloves, right? 😉 Anyway, cool zigzags! It’s very stylish!
Malinda Chaudhry