I can't believe I haven't touched this blog since 2014. 6 years today actually! I didn't even mean to write on the actual anniversary of my last post...I've been considering reviving the blog since last month and decided I didn't have anything to lose so here we are. It will be fun to get back in here and document the final renovations of this house and what shreds of sanity I might have left after this is all said and done. So much has changed over the last 6 years. We closed on this house … [Read more...]
Because I’m bored – 50 questions with directions not included

Seeing that I'm laid out with not much I can do, my dear bloggy friend Cassie decided to nominate me for a 50 questions post. Considering I had all these posts lined up and forgot to schedule, this is probably a good thing. Also a good thing is that this blog only has about 5 followers these days so these answers won't reach the masses. 1. What are you wearing? Cropped jeans, a t-shirt and a really sexy surgical boot. This boot will be my fashion accessory for the next 4 - 6 weeks. 2. … [Read more...]
a different kind of renovation – bunion surgery

If you found this on Pinterest and are looking for my recovery notes, pictures and progress are available here:http://directionsnotincluded.com/bunion-surgery-recovery Hi there from the comfort of my sofa. This is a different kind of renovation post - a little reconstruction to get myself back in working order.I had bunion surgery on my left foot today, it was actually surgery on the big toe and my pinky since I had different kinds of bunions on both. Sounds like fun, right? It's been over … [Read more...]
this is halloween – diy halloween tree
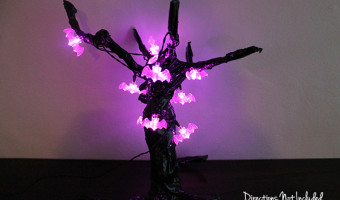
Quite some time ago I pinned this awesome Halloween tree. I kept going back to it on my Halloween board for inspiration, and then finally realized it was Gretchen's from Boxy Colonial's. She scored this amazing tree at a thrift store for next to nothing and decked it out with a handmade banner and lights. Color me jealous, because thrift stores in South Florida are horrendous so there was no way I was going to find a Halloween tree like that (or much of anything for that matter). But I wanted … [Read more...]
5th birthday celebration – streamer birthday decorations

I mentioned a few weeks ago that I'm that sucker of a friend who always ends up doing the decor for parties, wedding, showers and the like. My girlfriend Z, started pinning all sorts of things for her daughter's 5th birthday, which I decided to tackle myself after a few sweet texts. I shared the colorful fabric wreath, which served as the base for this party decor. This was last-minute crafting at its best so there are no step-by-step tutorials here. I created a streamer backdrop for the … [Read more...]
the students have graduated – a diy midcentury console table
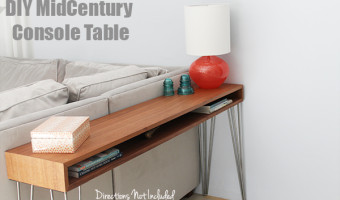
A few weeks ago I shared the start of our DIY Midcentury console table. I was all ready to have a step-by-step tutorial on how we built it. That is not the easiest thing to do when you have company throughout the process. And it is also not the easiest thing to do when things don't go as planned and you have a husband telling you to put down the camera and help him figure out your crazy project. So yeah, the tutorial isn't going to be as detailed as I had originally planned ;) In the last post, … [Read more...]
- 1
- 2
- 3
- …
- 53
- Next Page »