Directions Not Included

DIY and craft adventures of two humans, three dogs and two cats.

  • home
  • about us
  • house tour
    • before & during
    • the afters
  • project gallery
    • renovations
    • furniture & decor
    • holidays
    • events
    • crafts
    • archives
  • featured
  • contact
    • advertise
    • disclosure
    • privacy

backsplash reveal – diy white subway tile

January 23, 2012 16 Comments

I hope you all had a great weekend. We kept it pretty low key only tackling a few projects around the house and some crafts. Best parts of the weekend were meeting baby Parker (who I made the freezer stencil onesie for) and finally taking pictures of the house!. We can finally share the DIY subway tile backsplash I installed.
Our kitchen renovation is ALMOST there. If I wasn’t married to Mr. Start-100-Projects-At-One-Time, we would be further along in our renovations instead of having 100 half finished projects. Then again, if I wasn’t married to him, I wouldn’t be so happy so I guess I can live with the mess 😉 When we get our toekicks installed, I’ll do the full kitchen reveal but for now at least you get the backsplash reveal.
This project was all mine and was actually finished in December but we hadn’t taken the photos yet. I installed a backsplash and it looks good too, if I say so myself.
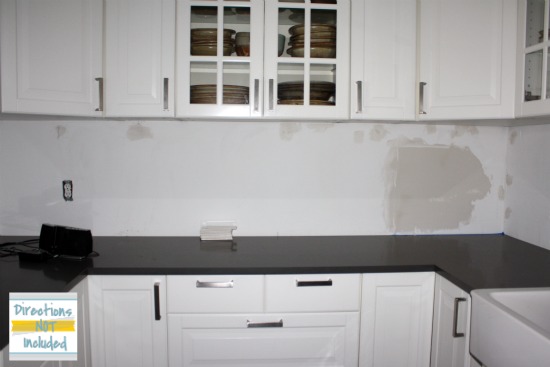
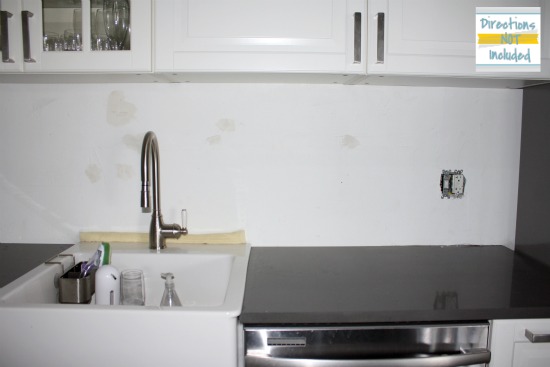
Since April of 2011, we’ve lived with this as our backsplash. The hubby was sure we needed to hire this out because there was no way we could make it look good. Leave it to hosting a baby shower in your house to light the fire under your butt. I wanted to do it, he was sure we couldn’t do it. I was tired of looking at this patchy mess so I was willing to give it a try.
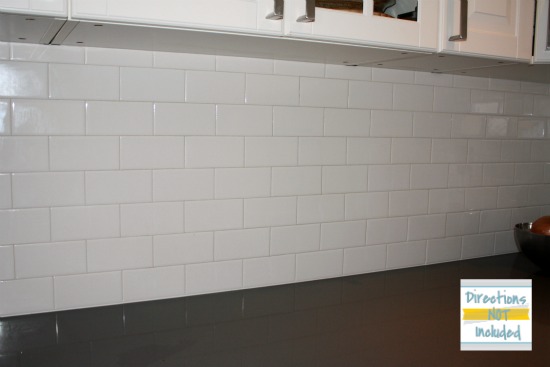
And I am so glad I did. That is my backsplash and I did it!
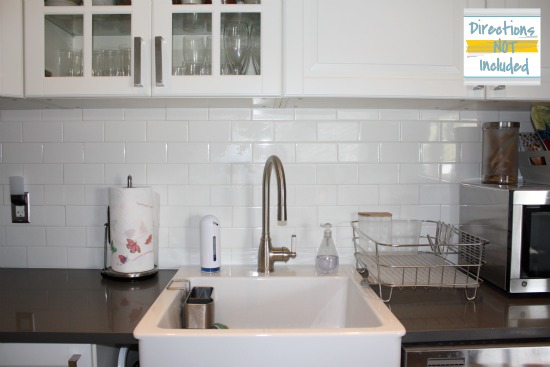
I think it looks pretty nice. Installation was easy to be honest, the only time consuming thing are the tile cuts. Grouting was not fun…at all. I was not a fan of the mess. I was covered in tile adhesive when setting the tiles but it came off easily from my skin and clothes. Grout on the other hand was a pain to remove, and cleaning the haze off the tiles is torture.
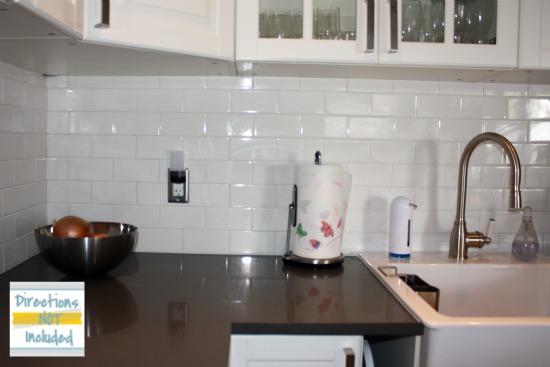
Some areas still need a good scrubbing to get the tile all shiny. Thankfully, the only one who notices this is me so I’ll keep cleaning on the days I get motivated. All the other days, I just smile at my reflection in the tile 😉
Pin It
~Anna
Thanks for following Directions Not Included!

you might also like:

student for the day - playing with power tools
a little list - 2014 goals
the list that probably won't happen - 2013 house goals

Filed Under: home decor, renovations, tutorial Tagged With: kitchen, tile

About Anna@DirectionsNotIncluded

Hi there! I'm Anna, the voice behind Directions Not Included. I'm a marketer, crafter, DIYer and lover of all things home related. You can usually find me covered in paint, cuddled with one of my pets or in front of a computer or other digital device. Thanks for reading Directions Not Included. I hope you stick around.

Comments

  1. marty (A Stroll Thru Life) says

    January 23, 2012 at 2:04 pm

    It looks fabulous. How exciting. Can’t wait to see the entire kitchen. Hugs, Marty

    Reply
  2. Maury Kilgo says

    January 23, 2012 at 2:33 pm

    love it! It looks beautiful. I’ve been trying to decide between white subway tiles or beadboard for my backsplash for a while. It’s such a classic look!

    Reply
  3. Cassie @ Primitive & Proper says

    January 23, 2012 at 2:49 pm

    oh i love it! subway tile is so classic and so pretty! it looks perfect!

    Reply
  4. jeanette from everton terrace says

    January 23, 2012 at 3:59 pm

    Fabulous job! I would put a sign on it that says “YES I DID THIS MYSELF” if I were you 🙂
    We are doing a kitchen right now and debating on the back splash. Going to put the white subway tile in the bathrooms upstairs and am thinking about it in the kitchen as well but the thought of the work is making me continue to search.

    Reply
  5. Patty says

    January 23, 2012 at 4:45 pm

    Love it!!! Subway tile is my absolute favorite. It looks fabulous!

    Reply
  6. Kelly says

    January 23, 2012 at 3:29 pm

    I love that you did it yourself and it looks STUNNING! No professional could have made it look any better than that!

    Reply
  7. Erin @ His and Hers says

    January 23, 2012 at 9:33 pm

    You go girl, for doing it all by yourself! I agree with Jeanette about that sign. 😉

    From,
    The wife of a man who won’t let her start 100 projects until he finishes the last one. Boo. 😛

    Reply
  8. DecorandtheDog says

    January 24, 2012 at 2:35 am

    Amazing. And now you can come to my house and do mine…because you do mighty fine work! You’re hired. I don’t pay well though. Sorry. You’re still in, right?

    Reply
  9. Kate @ craftwhatever says

    January 24, 2012 at 4:26 am

    Everything is looking so pretty! I have always wanted to tile something. I love the subway tile, too.

    Reply
  10. Lara says

    January 24, 2012 at 11:06 am

    It looks great!!!!

    Reply
  11. Tiffany @ {Living Savvy} says

    January 24, 2012 at 2:55 pm

    I think my favorite time is white subway! So clean with the black counter tops!

    Reply
  12. The DIY Show Off says

    January 24, 2012 at 4:12 pm

    Love it! Great choice!

    Reply
  13. Natalie says

    January 24, 2012 at 11:04 pm

    Oh I love it, so sparkly and clean. Great choice.

    Reply
  14. Tammy says

    January 27, 2012 at 12:46 pm

    Hey!

    I shared our backsplash tile DIY too. We found that you can use a microfiber clothe to buff the tile after you’re finished. Shiny!

    : ) Cheers to a job well done!

    Reply
  15. At The Picket Fence says

    January 27, 2012 at 7:50 pm

    Gorgeous! We had subway tile in our last kitchen and I loved it. Way to go with getting your DIY on! 🙂 Thanks so much for sharing this with us at Inspiration Friday~
    Vanessa

    Reply
  16. Fox Hollow Cottage says

    February 5, 2012 at 3:50 am

    Wow! GOOD FOR YOU. That is awesome, way to go tackling it yourself. Love me some subway tiles =) It looks great.

    Reply

Leave a Reply Cancel reply

Your email address will not be published. Required fields are marked *

hi there, i’m anna

dnirssyellow dnipinterestyellow dnifacebookyellow dniinstagramyellow AnnaDNI2014 Welcome to Directions Not Included. I'm Anna, the voice behind the blog. I'm a marketer, crafter, DIYer, and lover of wine and sushi. Oh and I love my husband Ray, too. I also seem to be a magnet for scruffy mutts and cats. Want to know more about us and what we are doing? Learn more here.

what we’ve been up to

looking for something?

pinterest addict

Visit Anna [DirectionsNotIncluded]'s profile on Pinterest.

our lovely sponsors

RMPotteryButtonFINAL2AD-Button adad

about

Directions Not Included follows the DIY and craft adventures of two humans, three dogs and two cats as they take one old Florida home and make it theirs.

This blog will feature DIY tips, before and after photos, craft tutorials, home decor trends, and gratuitous pictures of our five rescued furry children.

Copyright 2010 - 2014. Directions Not Included - Anna Cruz-Morales.

The contents of this blog, including text, original photos and ideas are the sole property of the author. If you intend to use my text or images, please link back to my site and credit given to Directions Not Included. Please share only one image and direct readers to my site. A notification email would be greatly appreciated.

like us on facebook

like us on facebook

don’t miss any of the fun

dnirssyellow dnipinterestyellow dnifacebookyellow dniinstagramyellow dnitwitteryellow dnigoogleyellow

subscribe via email

Enter your email address to subscribe to this blog and receive notifications of new posts by email.

Copyright Directions Not Included 2014 * ·Daily Dish Pro Theme * Modified by Directions Not Included * Genesis Framework * by StudioPress * WordPress * Log in