After buying the chalkboard paint to make the chalkboard tables, I found myself eyeing all sorts of things to cover in chalkboard paint. I love the idea of chalkboard walls in kitchens and other spaces, but chalkboard paint on a large scale would not work in our home.
I had to improvise, so I ran to Home Depot and picked up some MDF. I bought a small, thin, board for under 5 bucks. I sent the husband to cut it with the table saw in a few different sizes. He has access to the sculpture studio at work, which has an amazing collection of tools. I’m lucky he plays along and takes my projects to cut for me.

I wanted to try MDF because it has a really smooth texture and they are always using it on the DIY shows. Honestly, I just wanted to see what all the fuss was about. I gave it a light sanding once I had my pieces in the sizes I wanted. I read that priming MDF was important so it would absorb less paint, so both pieces received a nice coating of Zinnser Cover Stain with a roller.
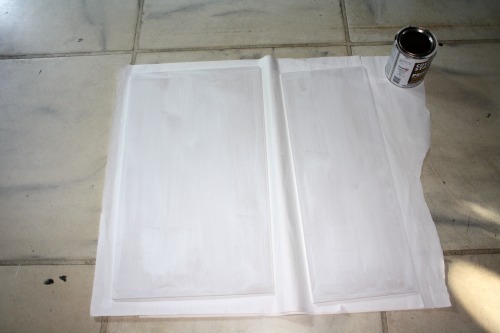
Since the texture of the MDF is so smooth, I made sure to pick up the smooth roller refills. The less noticeable the paint marks the better. Several coats of chalkboard paint and lots of drying time left me with new chalkboards. I think MDF is a great base for chalkboard paint. I’m really happy with it.

My little sister is getting the bigger one of these. Now she has a handy chalkboard for her studio apartment so she can keep track of all her things without using 1 million post-it notes like she normally does. She wanted it simple, so I left it plain so she can stick it to her fridge as is.
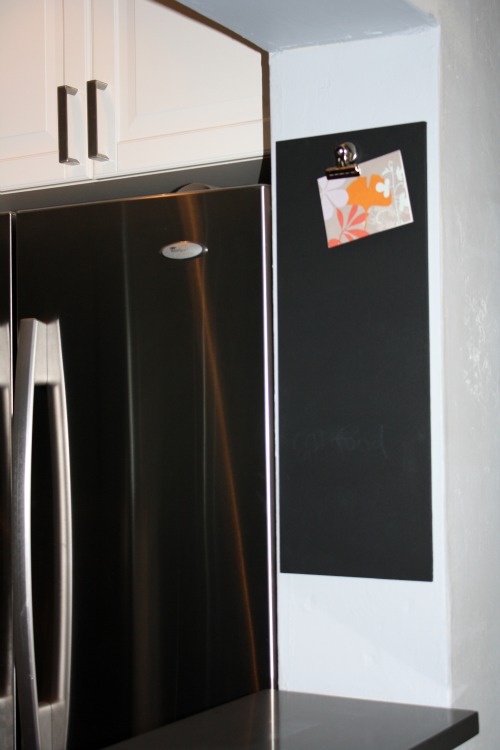
The smaller one is for our kitchen. We don’t have any real walls that won’t be covered in backsplash tile, so I decided to use the small piece of wall that is used as a little serving area between our kitchen and the family room. It had to be simple or the hubby would think I was cluttering the kitchen. No real frame needed but I did glue down a big bullnose clip so we can hang up invitations, notes and pictures.
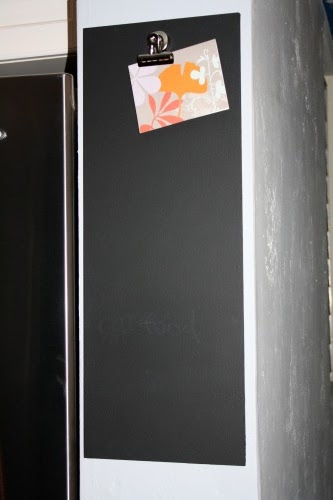
In order to hang it up on the wall without having to screw through it or figure out how to rig it on the back, I bought the 3M picture strips. This is the first time I’ve used the strips and I love them! They attach just like the 3M hooks with the adhesive backing but they have Velcro so you can adjust it to make it level without having to drill multiple holes if you screw up. Great product and I’ll be stocking up on them again.


Now we have an organized spot in our kitchen for reminders and all the kid photos that will end up there once school starts.

Now what do I paint next? I love this chalkboard stuff.
Linking up to my favorite parties all listed here: Link Events and…
Metamorphosis Monday
Making the World Cuter
Thanks for following Directions Not Included!
Yay for chalkboard fun! This turned out great! I love the sleek look!
I love chalk board paint too! every time I open up my paint cabinet I see it and then wonder what I am going to paint next!
Tiffany {Living Savvy}
those strips are so handy. What a cute project- perfect for photos. Found your blog through the Haven Conference– look forward to reading more.
-Kelly
Do you find those wall things to hang your items very well? I have been tempted to try them but i have never had very much luck with sticky tack!
I love it too! I painted a board and added it to the back of an old window frame and it turned out great!
You can never have too many chalkboards! Thank you for linking to Wicked Awesome Wednesday!
Cool! And I love the 3M velcro hooks! Thanks for sharing.
This is such a labor of love! Thanks for linking up at Creative Bloggers’ Party & Hop 🙂
Perfect little piece, love the clip on there too!
I love it and the picture strips was just brilliant! Thank you so much for linking up to It’s a Party!