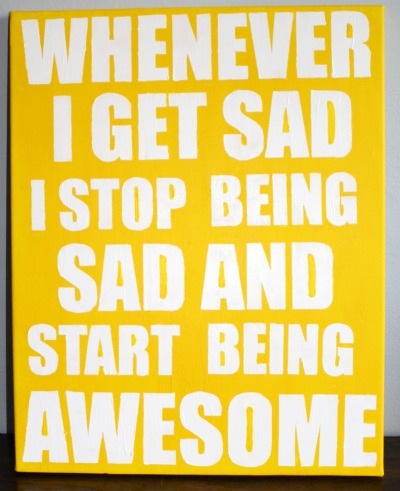
Another Pinterest inspiration. Are we noticing a trend here? My friend fell for this and since she swears she is not crafty she recruits me to make it for her. It was available at some point at an Etsy shop but the link no longer is valid.
 |
| Via Pinterest – Etsy link is broken |

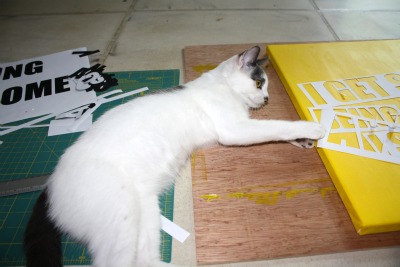
While I was letting the paint dry, I meticulously cut out the letters to create my stencils. I could have done this with the Cricut but I didn’t have a cartridge for the font I wanted and didn’t trust my ability to make the formatting work for the canvas. Photoshop worked well to get the right layout so printing it out was the easiest for me. If you have a Silhouette or the right cartridges and the Cricut Design Studio, those are definitely the way to go. I just used what I had.

The secret to cutting out the letters is to use a block font that has less curves to it. You can use a metal ruler and your craft knife to get a very clean edge. I swear by this Friskars craft knife for detailed cutting. It is seriously the best. It helps that I have a pretty steady hand as well. It is recommended kittens do not participate in the cutting since as you can see they do not facilitate the process.
I used Krylon Easy Tack to hold down my stencils on the canvas. It doesn’t leave a residue and helps secure the stencils so I wouldn’t make a mess. Make sure you press down around the edges of the stencils to make sure you have the cleanest stencil possible.


I used a smaller flat brush to fill in the stencils with white paint. I tried to get a good coverage without making it too messy around the edges.

Of course, when working with a paper stencil, the paint can spread but don’t fret if it looks messy. You’ll notice there is a bit of white paint that spread out around the letters.
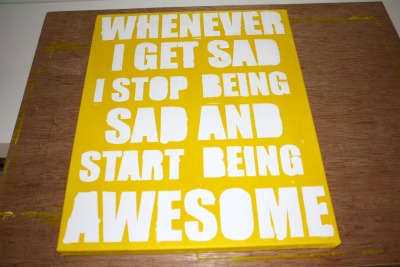

I let it dry and then went back over it with yellow paint a few times with a small detailing brush and you would never know when you look at it. Looking good, right? But if you look closely do you notice anything strange about the letters?

I printed out those individuals letters again and this time just cut out the center pieces and used those as stencils to fill in the letters. Same process as before with a light spray of the Krylon Easy Tack.

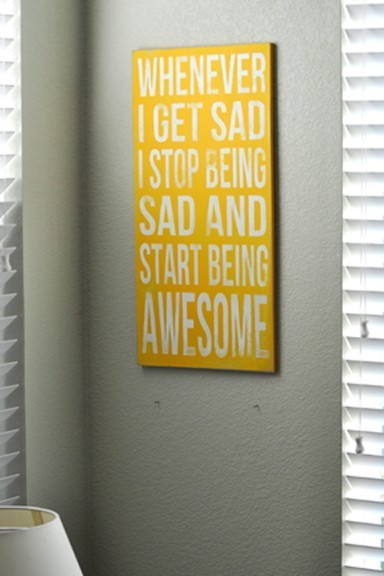
I have to confess, I had no idea this was a quote from Barney in “How I Met Your Mother” but it makes me smile and will completely brighten up their living room.
Linking up to my favorite parties all listed here: Link Events
And Metamorphosis Monday
This is great! I totally want to make one for my office because every week when I email my time sheet to our controller (who’s a friend of mine) I put something about being awesome in the subject line. lol I kinda have a thing with being awesome – once my boss asked why I had a stapler at my desk and he didn’t, my answer – “because I’m awesome”
That’s so cool! I love the positive upbeat message and color!
I love this! (And I love How I Met Your Mother… great quote).
love that! ah, the joys of a cutting machine that i have yet to experience! ps-love your kitty assistant!
what a fun sign! The bright yellow just makes it even more awesome!
Oh it turned out awesome! I have been wanting to do something like this forever, but everyone seems to own a Silhouette Cutting Machine, which I don’t. I am so happy to see I can do this without it! 🙂
Found you on the Mad in Craft Party!
http://www.releasemecreate.blogspot.com
That is awesome! Love that show!
Great project, will try this one!
I really like this idea! It’s simple and adds a bold burst of energy to room. Thanks for sharing.
http://www.keepitsimpleyay.blogspot.com
Thanks for letting us know how to make these cool subway signs even if you don’t have a cutting machine.
This is a super cool sign and I love that your kitty “helps” the same way mine do! I got quite a chuckle out of that. I would love for you to link your post up with my Savvy HomeMade Monday blog party and I am a new follower!
I LOVE THIS! Totally awesome (and awesome quote btw).
-Carly @ Createlive
Great quote…Barney cracks me up, but I didn’t realize it was one of his lines either! You did such a great job on this!!
Thanks for linking up!
I love this quote & artwork!
♥Sweet Tea Serendipity
I love it!! It’s going to look absolutely awesome in their living room! 🙂
love the quote and the bright yellow.
I love this! I smile whenever I hear that quote-the yellow is perfect with it.
LOVE Pinterest! I like this project too! Keep them coming! Thank you for linking to Wicked Awesome Wednesday!
I really really like this! It is so bright and I love the message. You did a fabulous job! I have a party going on over at my blog if you want to join! I’d love to have you! Check it out under the “Stache Party” page on my blog: mylilpumpkinpatch.blogspot.com
Nice! I’ve seen this quote on pinterest a few times. Your version is definitely one of my favorites 🙂
I know that you have so many blog parties to choose from so thank you for choosing Creative Bloggers’ Party & Hop. This post is added to the party blast! Enjoy the rest of the week :)I know that you have so many blog parties to choose from so thank you for choosing Creative Bloggers’ Party & Hop. This post is added to the party blast! Enjoy the rest of the week 🙂
Ack. I love it. There’s a strong possibility that I am going to make one of these this weekend.
Thanks for linking it up, baby.
love it! what a great saying 🙂
I’m your newest follower!
Best.show.ever. Great job!
Megan
http://www.CutTheCraft.com
Okay, I saw this on Freestyle Friday (thank you for linking up with me!) and found it to be legen… wait for it… DARY! HIMYM is one of my favorite shows! You made my day!
Happy to be your newest follower ~ Adrianne
happyhourprojects.blogspot.com
This would be great for the mud room where my kids could read it each morning they leave for school! Thanks! I hope you will come share this at my VIP party today. http://designergarden.blogspot.com/2011/08/vip-party-22.html
great job! (especially for doing it “old school” without the aid of a machine!
gail
You’ve been featured at Freestyle Friday, come grab a button!
Adrianne
happyhourprojects.blogspot.com
I love this! Barney Stinson is, well…awesome! I pinned it on Pinterst too awhile back but haven’t gotton that far down on my project list yet. Great job with the letters, I’ll have to do it old school as well. Fun fun!
Oh, and I’m your newest follower!
http://domesticimperfection.blogspot.com
Love this picture, great job! I followed the link of Newlyweds on A Budget…
I LOVE it!!
I.LOVE.THIS!! I shall make one. I’ll send you a link when I’m done 🙂 Thanks for the inspiration!
I love this project. And I would really love if you would hook it up to my new link party all about gratitude and appreciation because this is just the kind of reminder we all need! The link Party will be up and running today on my blog, A Mother Seeking. Come by, please?!?! 🙂 Thanks!
Meredith From A Mother Seeking Come find me on my blog, A Mother Seeking…
Anna, this is great and after seeing this and because of my daughter and mine’s shaed love of how i met your mother we had to recreate in our own style. You can check it out here…
http://michellescraft.blogspot.com/2011/11/awesome.html
Thanks so much for the inspiration and I have given credit where credit is due 🙂