Directions Not Included

DIY and craft adventures of two humans, three dogs and two cats.

  • home
  • about us
  • house tour
    • before & during
    • the afters
  • project gallery
    • renovations
    • furniture & decor
    • holidays
    • events
    • crafts
    • archives
  • featured
  • contact
    • advertise
    • disclosure
    • privacy

freezer paper stencil tutorial – baby gift

January 12, 2012 9 Comments

I’m going to start this post off with an apology for my photos. I’ve been playing with freezer paper stencils since this weekend as my first project for my Pinterest Resolutions. I actually made quite a few this past weekend but forgot to finish taking pictures of them. I was so excited how they came out, I just wrapped them up and realized after I had gifted them that there were no photos! I made these late last night…as in I’m writing this at 12:15 am.

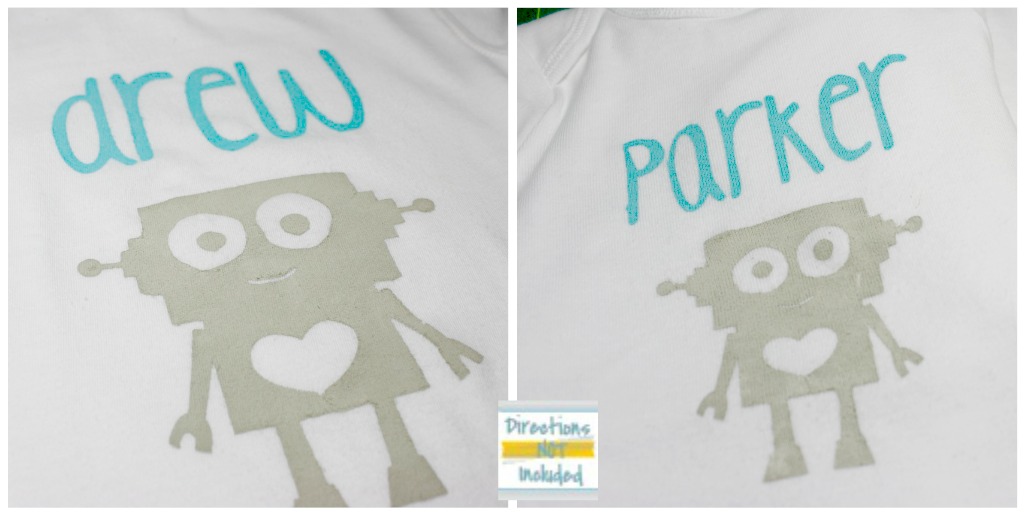
So these two special little outfits are for two of my favorite boys.

As I’m writing this, I still haven’t met one of them but he is guaranteed to be a favorite. My dear friend, Rebecca, gave birth to her second little boy on Wednesday afternoon. Since I wanted to make sure there were no last minute names changes I waited until Wednesday night to finish the presents. Hopefully Rebecca is too tired today to check her phone and see this post before I make it to the hospital 😉

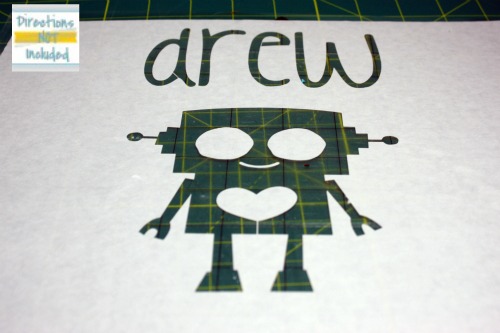
So I designed two stencils using my new Silhouette on the computer. I love how simple the program is and how many images are available for downloading. Once I was happy with my design I laid out some freezer paper with the shiny side down on my Silhouette cutting mat.

It is almost impossible at night to get a photo of the stencil already cut out but not peeled from the mat at night. Once I peeled off the paper in the areas where I wanted paint, I ended up with something like this. Drew is the oldest and turning two next month.

Once you pull out the pieces of the stencil where you want to paint, you need to pull the entire piece of freezer paper off. It will get all warped but that is okay. You need to have a hot iron ready and iron on the paper shiny side down onto your fabric. I used a plain white tee from Target. Pay special attention to the little edges around your design to get a clean look. It is almost impossible to see but trust me it is there.
I think fabric paints which don’t require any work are the best but unfortunately, I just had regular paints and Martha Stewart Fabric medium. Don’t get me wrong, it works amazingly well and the color selection is awesome but I would prefer to skip an extra step if possible. I used a pool blue and a cement gray color mixed with the fabric medium as instructed.

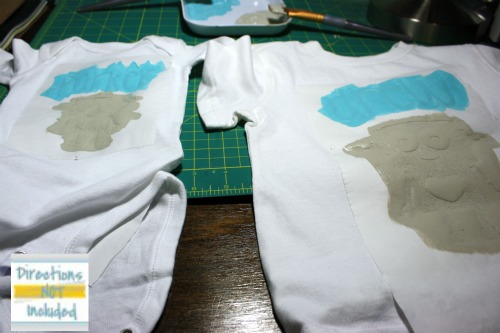
This is the fun part. Paint your stencil. I used regular brushes this time but I prefer to use foam brushes. You want to dab your paint on to the stencil taking care not to push the edges of the paper itself too much so you don’t smear any paint under the stencil.

After I finished painting both outfits, a little onesie for baby Parker and a tee for Drew, I let them dry for some time. I’m impatient and wanted to see right away but trust me, let the paint dry completely before you peek. The drier it is, the less bleeding you will see.

And here are the finished outfits! Aren’t they cute? Once they dry, it is very important that you let the paint dry for 24 hours and then iron them again. The hot iron helps set the paint with the medium completely. I’ll be doing that part right before I visit the hospital.

Pin It

I can’t wait to meet little Parker today and get to see Drew be a perfect big brother. I can’t believe I completed my first Pinterest Resolution already! Only 11 more to go.
Have you tried freezer paper stencils yet? What are your go to gifts for new babies? I always buy books or something I know the mom needs but I love to add in a handmade item to the stash as well.

Don’t forget to enter the RM Pottery giveaway!

~Anna

Thanks for following Directions Not Included!

you might also like:

this is halloween - diy halloween tree
the students have graduated - a diy midcentury console table
bachelorette weekend favors - diy hangover kit

Filed Under: crafts, tutorial Tagged With: baby friendly, craft tutorial, kid friendly

About Anna@DirectionsNotIncluded

Hi there! I'm Anna, the voice behind Directions Not Included. I'm a marketer, crafter, DIYer and lover of all things home related. You can usually find me covered in paint, cuddled with one of my pets or in front of a computer or other digital device. Thanks for reading Directions Not Included. I hope you stick around.

Comments

  1. Jamie says

    January 12, 2012 at 1:01 pm

    great tutorial! I can’t wait to try this 🙂 I still kind of can’t believe all you need is freezer paper!

    Reply
  2. Cassie @ Primitive & Proper says

    January 12, 2012 at 1:36 pm

    those are adorable! i need to try this, too! i actually have something i want to make for my MIL for her birthday and this would be great method to use. and also, very nice of you to think of the older brother, too! 🙂 i loved when emmy was born and people brought things for sawyer,too- so sweet!

    Reply
  3. Cassie @ Primitive & Proper says

    January 12, 2012 at 1:36 pm

    those are adorable! i need to try this, too! i actually have something i want to make for my MIL for her birthday and this would be great method to use. and also, very nice of you to think of the older brother, too! 🙂 i loved when emmy was born and people brought things for sawyer,too- so sweet!

    Reply
  4. Shannon says

    January 12, 2012 at 2:10 pm

    I promise I’ll take a picture of the awesome shirt you made me… although I may need to borrow your camera unless you want an iphone picture. Or maybe I’ll just bring it back over to your house and you can take the picture… 😉

    Reply
  5. Natalie says

    January 12, 2012 at 4:54 pm

    These are gorgeous and thanks for the instructions. Do you think a cricut would cut freezer paper as well?

    Reply
  6. Ashley@AttemptsAtDomestication says

    January 12, 2012 at 8:05 pm

    These are too cute! I love them and it is such a sweet, thoughtful gift!

    Reply
  7. Emily @ EAKaHouse says

    January 14, 2012 at 1:33 am

    Great job! I’ve been dying to use fabric paint on something so this might be a winner for me.
    Cheers!

    Reply
  8. Jean @ Flower Hill says

    April 6, 2012 at 11:14 am

    Love this tutorial and this is such a sweet gift for a newborn!

    Reply

Trackbacks

  1. Until the end - Harry Potter Onesies - Directions Not Included says:
    March 3, 2014 at 9:18 pm

    […] used my stand-by freezer paper tutorial, and they all came out perfectly. The most important tip I can give you when using freezer paper as […]

    Reply

Leave a Reply Cancel reply

Your email address will not be published. Required fields are marked *

hi there, i’m anna

dnirssyellow dnipinterestyellow dnifacebookyellow dniinstagramyellow AnnaDNI2014 Welcome to Directions Not Included. I'm Anna, the voice behind the blog. I'm a marketer, crafter, DIYer, and lover of wine and sushi. Oh and I love my husband Ray, too. I also seem to be a magnet for scruffy mutts and cats. Want to know more about us and what we are doing? Learn more here.

what we’ve been up to

looking for something?

pinterest addict

Visit Anna [DirectionsNotIncluded]'s profile on Pinterest.

our lovely sponsors

RMPotteryButtonFINAL2AD-Button adad

about

Directions Not Included follows the DIY and craft adventures of two humans, three dogs and two cats as they take one old Florida home and make it theirs.

This blog will feature DIY tips, before and after photos, craft tutorials, home decor trends, and gratuitous pictures of our five rescued furry children.

Copyright 2010 - 2014. Directions Not Included - Anna Cruz-Morales.

The contents of this blog, including text, original photos and ideas are the sole property of the author. If you intend to use my text or images, please link back to my site and credit given to Directions Not Included. Please share only one image and direct readers to my site. A notification email would be greatly appreciated.

like us on facebook

like us on facebook

don’t miss any of the fun

dnirssyellow dnipinterestyellow dnifacebookyellow dniinstagramyellow dnitwitteryellow dnigoogleyellow

subscribe via email

Enter your email address to subscribe to this blog and receive notifications of new posts by email.

Copyright Directions Not Included 2014 * ·Daily Dish Pro Theme * Modified by Directions Not Included * Genesis Framework * by StudioPress * WordPress * Log in