Directions Not Included

DIY and craft adventures of two humans, three dogs and two cats.

  • home
  • about us
  • house tour
    • before & during
    • the afters
  • project gallery
    • renovations
    • furniture & decor
    • holidays
    • events
    • crafts
    • archives
  • featured
  • contact
    • advertise
    • disclosure
    • privacy

a crafting challenge – crepe paper garland

March 12, 2012 15 Comments

A few weeks ago, a few bloggy friends decided to form a group to support and challenge each other. We thought it would be fun to do a regular post making a craft out of the same material just to see how we would each interpret the challenge. Our first material was crepe paper. When I think of crepe paper, my mind automatically goes to crepe paper streamers. What I wanted to try out was making a crepe paper garland. After all, isn’t crepe paper the same as tissue paper? After a bit of research, I learned that crepe paper is:

  • Firmer and more durable than tissue paper
  • Available in sheet form and streamer form
  • Crinkled in texture
  • Nearly impossible to find in Miami
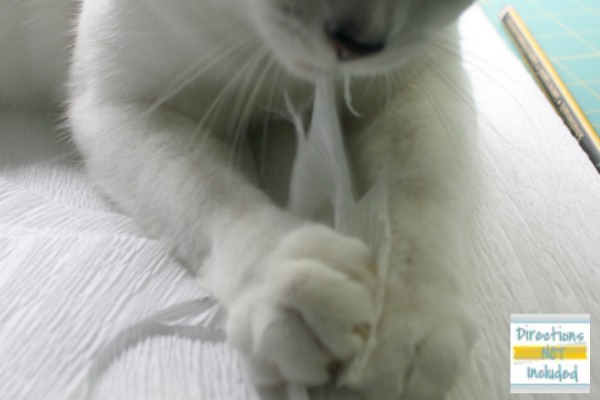
  • A very tasty kitten treat

I finally found some in sheets at a local art shop but the color selection was lacking. I grabbed some in white since I had no idea how the garland idea would work. I was hired to do some bridal shower decorations and was hoping that this would turn out to be something that would work for that job.

I used the lid of a mason jar to draw circles on the paper which was folded over several times. I just cut them out with scissors not worrying about the circles not being perfect.

I folded over two circles at a time and used a needle and thread to start my garland.

After a few minutes you start seeing the garland take shape. The crepe paper is much firmer than tissue paper so you can spread out the circles a bit to make them fuller.

Just like my fabric wreath, this is one of those repetitive crafts but the outcome is worth it.

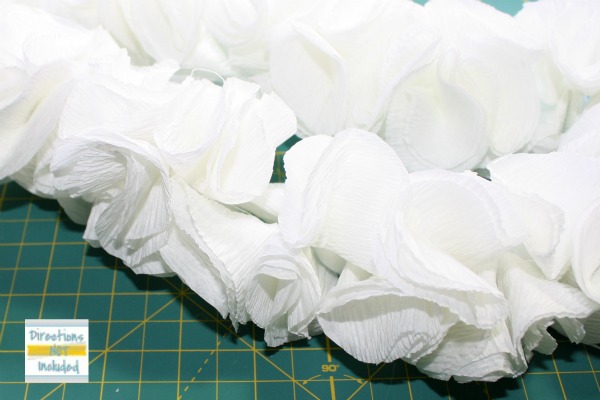
The crepe paper garland doesn’t look so lovely hanging out from the counter in our kitchen but I know it will be perfect over the dark wood buffet it will be displayed on during the shower.

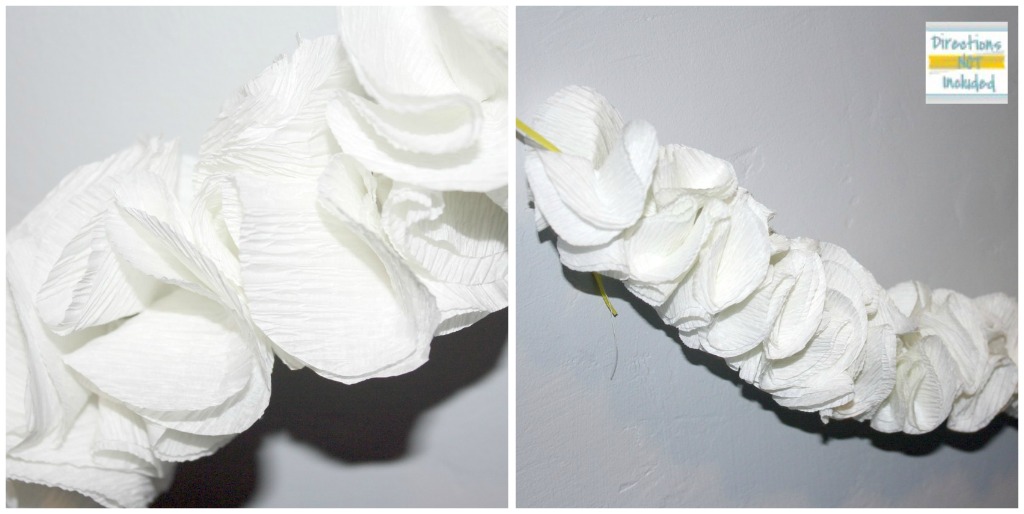
Here are a couple of close ups. I used a piece of yellow ribbon on each end that can be used to hold it up.

Hope you all had a great weekend! I dealt with a sick, pathetic husband all weekend. It was “serious” enough to turn him into a big baby who spent the weekend telling me what to do with his precious belongings when he passed. Dramatic, much? It also means we did not finish tackling our landscaping project and I barely was able to craft. Boys.
~Anna

Thanks for following Directions Not Included!

you might also like:

may the force be with you - star wards stencil shirt
this is halloween - diy halloween tree
munchkin outdoor playroom - stenciled nautical art

Filed Under: crafts, party decor Tagged With: craft tutorial, garland, paper, party decor

About Anna@DirectionsNotIncluded

Hi there! I'm Anna, the voice behind Directions Not Included. I'm a marketer, crafter, DIYer and lover of all things home related. You can usually find me covered in paint, cuddled with one of my pets or in front of a computer or other digital device. Thanks for reading Directions Not Included. I hope you stick around.

Comments

  1. Danni Baird @ Silo Hill Farm says

    March 12, 2012 at 11:46 am

    So cute and clever! I love the idea of your craft challenge too!

    Reply
  2. Cassie @ Primitive & Proper says

    March 12, 2012 at 11:56 am

    that challenge group sounds so fun and i LOVE what you made! love the ruffled look!

    Reply
  3. Tiffany @ {Living Savvy} says

    March 12, 2012 at 1:52 pm

    This is SO cute! I love the texture and the feeling like it is the bottom of a wedding dress! Great job!

    Reply
  4. Alison says

    March 12, 2012 at 1:58 pm

    Ooooh I love the garland!

    Your poor hubby, I wonder why ilnesses seem to strike them 1000 times harder than us girls …:)

    Alison
    x

    Reply
  5. Kari says

    March 12, 2012 at 2:10 pm

    Anna I love it! It looks so fantastic! I had no idea that crepe paper came in sheets-good to know!

    I can’t wait to see how it looks for the shower.

    Kari

    P.S. My husband is the same way! Every time he gets sick it’s like he’s never been sick before in his life.

    Reply
  6. Ange says

    March 12, 2012 at 2:30 pm

    Oooh, love the garland. It looks so pretty and perfect for a bridal shower! Sorry the sick hubby held you back this weekend, they can be really big babies when they get sick. My hubby is the opposite, he gets stubborn and refuses to admit he’s ill.

    Reply
  7. Ashley@AttemptsAtDomestication says

    March 12, 2012 at 5:59 pm

    Love it! How cute and easy!

    Reply
  8. How to Nest for Less says

    March 12, 2012 at 6:41 pm

    Cute job Anna!!

    Reply
  9. Emily @ EAKaHouse says

    March 12, 2012 at 5:00 pm

    That turned out lovely! Very wedding-y.

    Reply
  10. Erin @ His and Hers says

    March 12, 2012 at 9:24 pm

    hahaha–kitten treat and your drama queen husband. Cute garland! I love the idea of challenging yourself with different materials–how fun!

    Reply
  11. Kelly says

    March 13, 2012 at 2:08 am

    It turned out so beautiful but MAN I know that must’ve been tedious!

    Reply
  12. Cheryl @ That's What Che Said says

    March 13, 2012 at 2:08 pm

    I love this garland! Love it! So easy too! I am pinning this!

    Reply
  13. Unknown says

    March 14, 2012 at 10:42 am

    Lovely I like it and I found a place online that sell it in sheet form and has 25 colors to choose from. http://www.crepepaperstore.com

    Reply
  14. Patty says

    March 14, 2012 at 5:18 pm

    Love it! That’s way cuter than the normal “let’s unroll the crepe paper and twist it around” look! CUTE!

    Reply
  15. Katie Adams says

    March 15, 2012 at 7:42 pm

    So pretty! It reminds of a floral lei. Great tutorial too! I would love for you to share with my readers on Blog Stalking Thursday!

    http://thecraftyblogstalker.blogspot.com/2012/03/blog-stalking-thursday-32.html

    Reply

Leave a Reply Cancel reply

Your email address will not be published. Required fields are marked *

hi there, i’m anna

dnirssyellow dnipinterestyellow dnifacebookyellow dniinstagramyellow AnnaDNI2014 Welcome to Directions Not Included. I'm Anna, the voice behind the blog. I'm a marketer, crafter, DIYer, and lover of wine and sushi. Oh and I love my husband Ray, too. I also seem to be a magnet for scruffy mutts and cats. Want to know more about us and what we are doing? Learn more here.

what we’ve been up to

looking for something?

pinterest addict

Visit Anna [DirectionsNotIncluded]'s profile on Pinterest.

our lovely sponsors

RMPotteryButtonFINAL2AD-Button adad

about

Directions Not Included follows the DIY and craft adventures of two humans, three dogs and two cats as they take one old Florida home and make it theirs.

This blog will feature DIY tips, before and after photos, craft tutorials, home decor trends, and gratuitous pictures of our five rescued furry children.

Copyright 2010 - 2014. Directions Not Included - Anna Cruz-Morales.

The contents of this blog, including text, original photos and ideas are the sole property of the author. If you intend to use my text or images, please link back to my site and credit given to Directions Not Included. Please share only one image and direct readers to my site. A notification email would be greatly appreciated.

like us on facebook

like us on facebook

don’t miss any of the fun

dnirssyellow dnipinterestyellow dnifacebookyellow dniinstagramyellow dnitwitteryellow dnigoogleyellow

subscribe via email

Enter your email address to subscribe to this blog and receive notifications of new posts by email.

Copyright Directions Not Included 2014 * ·Daily Dish Pro Theme * Modified by Directions Not Included * Genesis Framework * by StudioPress * WordPress * Log in