We only have furry kids but I am surrounded by a bunch of little ones thanks to all my friends. Most of them call me Tia – which is Spanish for Aunt – so I try to keep up with the proper Auntie behavior and spoil them rotten.
I have always wanted to pick up the Rustoleum Chalkboard Paint but had no idea what I would make to justify the purchase. In comes the IKEA Lack Side Table and a reason to finally buy the paint. IKEA hacks are great because you can take a relatively inexpensive piece and completely customize it without having to spend hours thrifting to find that perfectly inexpensive piece.
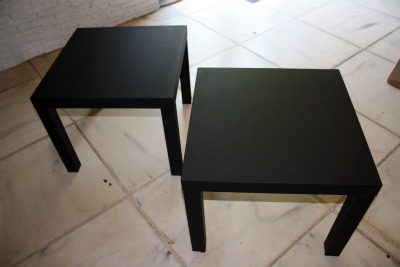
You can get this:

From this:
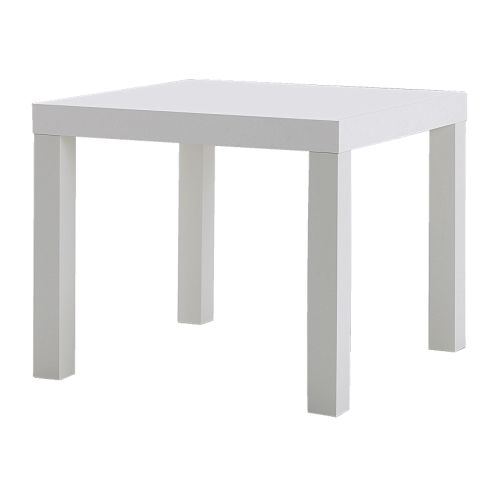 |
| Lack Side Table |
Simple and CHEAP! I spent all of $15 for two of these. The hubby gave me that look when I loaded them into our cart in IKEA.
“Where are you putting those?”
“Just trust me.”
I like to paint furniture when he is not home. It makes it easier to hide the mess I make :). I pulled out the tables and took the tops outside to prime with my trusty Zinnser Cover Stain. No need for a picture because white paint on a white table = white table. I let them dry for some time in the hot Florida sun and moved the tables inside for painting with the Chalkboard Paint. The back of the container mentioned humidity and temperatures when using and it was HOT so I didn’t want to take any chances.
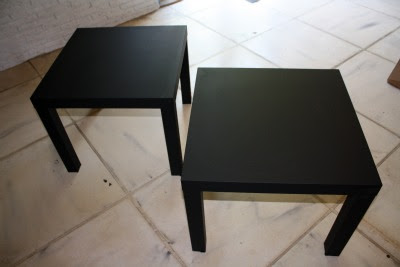
I put on a good coat of the paint ignoring the streaky finish. The paint is very similar to a primer in that it is more watery in consistency than regular paint. I let it dry fully for a few hours and gave it another good coat until it was completely even. I did the first two coats with a brush because I was being lazy and didn’t want to go out and buy refill rollers. Definitely use a roller for a smoother finish. I gave them another once over with the roller and it made a big difference.
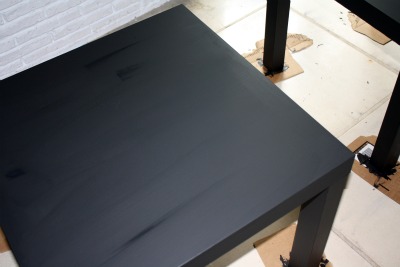
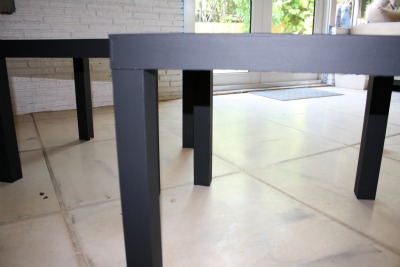
I let them dry overnight and and painted the legs with two coats. Since the tops were going to be the main painting area I wanted more coats on them.


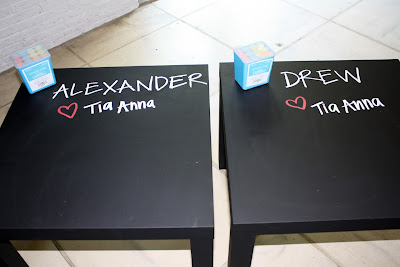
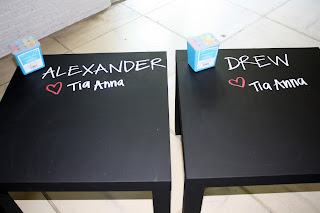
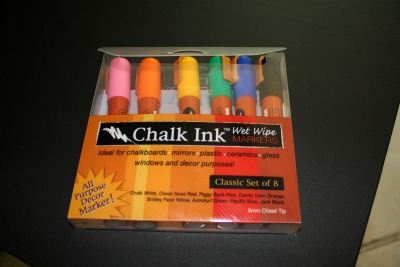
I bought these Chalk Ink Markers and was excited to try them out to write out my notes.

I paired the tables with some .99 chalk from Target in order to complete the present. Now two lucky little ones are getting chalkboard tables from Tia!
Perfect little table for a playroom or their own room so they can get creative. No one is going to get yelled at for drawing on the furniture now 🙂 Go make one of these for a little one in your life. I’m sure they will love it!

Linking up to my favorite parties all listed here: Link Events
And Metamorphosis Monday
Edited to add my seal of approval from Alexander. I think he likes it 😉

Thanks for following Directions Not Included!
what a great idea for a kids room…
I’m inviting you to add this to our linking party at
http://www.passionatelyartistic.com/2011/07/american-pickers-with-linking-party.html
Have a great weekend,
Maggie
So cute and creative!! Thanks for the tips on the paint, I’ll be doing my pantry doors in a few days!
fabulous! what a wonderful present!
What a sweet and creative idea! You are definitely taking that aunt role seriously 🙂 They’re going to love their new fun furniture!
themusingsofasimplegirl.blogspot.com
What an adorable DIY project! Thank you so much for sharing.
Happy Monday!
Great price for the tables..but you made them look like a million bucks! And Chalk Ink, I haven’t heard of these but how fun! Thanks so much for sharing at Creative Bloggers’ Party and Hop, I am co-hosting this week and I was so happy to find you there! I am now following…I hope you will be able so stop by and visit soon!
creativecarmella.blogspot.com
What a nice Tia! I love buying things for our friend’s babies (it saves me from having them). This would be great to have for when they come over and play (and they look classy enough I’d use them as side tables when they were gone). I have a long hallway I want to cover in chalkboard paint but my husband just rolls his eyes at me.
This comment has been removed by the author.
Thanks for the idea Anna. Pinning it so that I can use it in future 😉
Also, following you now! There’s a lot to read on your blog 🙂
-Tanya
http://tanyaanurag.blogspot.com/
I’m so honored that you chose to join the Creative Bloggers’ Party & Hop. Thank you for adding this special masterpiece to rock my party 🙂
Such a great idea, love it!!
Adorable gifts. Lucky kids! Thanks for visiting Growing up Gardner.
Following back 🙂
These are great. I have always wanted to get those little IKEA tables and I have always wanted to use chalkboard paint. I would love it if you would stop by the crafty link party I am just starting and link up this post!
http://linesacrossmyface.blogspot.com/2011/07/craft-link-party-1-cure-for-common.html
:)Rachel
I am chalkboard paint obsessed and had never seen the chalkboard ink! Those are fabulous! Your table looks great. I hope you will come to my HomeMade Monday blog party next week at HomeSavvyAtoZ.com to share! Looking forward to blogging with you!
PS… I am your newest follower and “like” you on FB!
cute! What a great idea 🙂
http://www.whatyoumakeit-coley.blogspot.com
it looks great. this makes me want to steal my roommates tables (which are the same) and paint them!
great idea! great gift! i’ve never even heard of that chalk stuff…learn something new every day 🙂
Very cute! Following from I Heart Naptime link party. Would love to have you link this up to my {wow me} wednesday link party going on right now over on my blog {if you haven‘t already!}. Hope to see you there.
Ginger
gingersnapcrafts.blogspot.com
Great idea. Love the chalk ink! Thanks for linking to Wicked Awesome Wednesday!
So cute. I want to make one for our playroom. Thanks. Visiting from Sugar and Dots.
Gosh so cute! Very lucky sobrinos indeed 😉
xoxo
Kristina
@PearlGateway
Very cute! They look great! And how nice of you to spoil them rotten. lol Thanks for linking up to this week’s party.
I found your fabulous project and blog through the linky party at Somewhat Simple!
I’d like to invite you to my weekly T.G.I.F. Linky party to share your projects — I’m looking to grow my party with good quality projects just like this one….here is the direct link if you’d like to join us sometime – the linky is up Thursday evening – Tuesday….:)
T.G.I.F. Linky Party
Thanks for linking up, Anna! Your chalkboard tables rock!
Love this! My daughter would adore it!
I’d love for you to link up to our Crafts for Under Twenty Somethings Party going on now until noon Saturday!
Melanie
http://bearrabbitbear.blogspot.com/2011/08/crafts-for-under-twenty-somethings_17.htm