Directions Not Included

DIY and craft adventures of two humans, three dogs and two cats.

  • home
  • about us
  • house tour
    • before & during
    • the afters
  • project gallery
    • renovations
    • furniture & decor
    • holidays
    • events
    • crafts
    • archives
  • featured
  • contact
    • advertise
    • disclosure
    • privacy

refinishing an exposed beam ceiling – part 1

January 2, 2012 9 Comments

We are starting off the year with a big project. One that will hopefully lead a finished family room in the first half of the year. The space currently looks like this. 

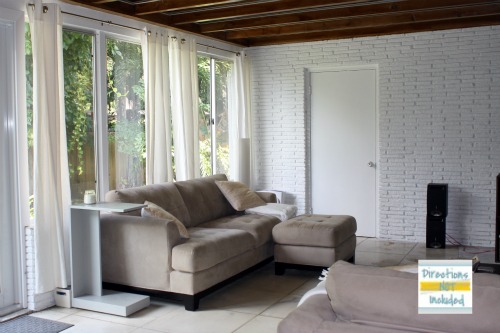
This room was one of the biggest selling points for us. It is a massive room with tons of character which makes it great for entertaining. It had some odd features like tons of dingy painted slump brick we had to refresh and a 3 foot deep planter and fountain in the corner that we lovingly called that the litterbox that had to go. This is what it looked like on the day we closed. 

Our dream for the ceiling has been more along the look in the picture below from my cousin JandJHome’s dining room. Dark exposed beams and white tongue and groove wood. 

Instead it has looked more like this the past year. No insulation, an old track frame from the ceiling tiles that once covered the wood and a beat up look. You can’t see in the photos but all along the wood pieces in between the beams there are nails sticking out that come from our roofing. I guess they were going for that sexy industrial look?
The hubby and and friend have been busy framing up the beams with wood 1 x 2 pieces. We had a new AC installed in the back part of the house earlier in the year (only the front side of the house had central and the back had wall units) so we framed up the ducts too so they are no longer just hanging out. 

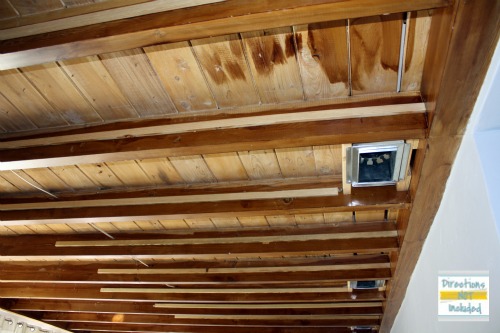
All of that was in preparation for the not so fun work that needed to be done. We live in South Florida. No insulation in a flat roof room that faces West is not good for the cooling bills. The boys worked late into the night a few days installing the insulation and getting the drywall up. 

We really wanted, I should say, I REALLY wanted to match the tongue and groove look. We priced out a ton of options and sadly none of it would work in the budget. To make matters worse, the beams are not precisely spaced. There are variations which would have meant cutting all the individuals wood pieces one by one which would have made this an even more tedious project. We have an open permit that is getting close to expiring so we just have to get this done. So for now we have drywall going up in between the beams. Maybe in the future we can do the tongue and groove. 

This week will consist of a ton of mudding, painting the mudded drywall white and restaining the beams to match our dark wood floors. This is hardly glamourous work but it sure will help the room near a more finished look. Once the dirty ceiling work is done, the floors will be replaced. 


What is on your list of major projects for 2012? For us this family room, our master bedroom and the exterior of the home are top priority. 
~Anna

Thanks for following Directions Not Included!

you might also like:

and behind this door - florida room plans
student for the day - playing with power tools
project nursery - chalkboard arrow sign

Filed Under: home decor, renovations Tagged With: beams, exposed beam ceiling, family room, renovations

About Anna@DirectionsNotIncluded

Hi there! I'm Anna, the voice behind Directions Not Included. I'm a marketer, crafter, DIYer and lover of all things home related. You can usually find me covered in paint, cuddled with one of my pets or in front of a computer or other digital device. Thanks for reading Directions Not Included. I hope you stick around.

Comments

  1. Jamie says

    January 2, 2012 at 1:12 pm

    It’s going to be gorgeous!!!! I can’t wait to see the end result. And your comment about the litter box is cracking me up!

    Reply
  2. Cassie @ Primitive & Proper says

    January 2, 2012 at 1:32 pm

    it is going to look so amazing! i love those exposed beams! even without the tongue and groove the contrast with the white and wood will be amazing…. i am slightly jealous over here…. 😉

    Reply
  3. Kat says

    January 3, 2012 at 2:11 am

    Wow…I can’t wait to see the final product. This is going to look GREAT! Your house has sooo much potential and you are totally making the most of it. I love it!

    Reply
  4. Marci says

    January 3, 2012 at 2:16 am

    Wow. That is one huge project but the end result is going to be fabulous. What a beautiful room with so much character.

    Reply
  5. Trissta says

    January 3, 2012 at 2:19 am

    OHHHH!!! It’s gonna look SOO GOOD! I’m so excited to see how everything goes!

    Much Love,
    Trissta

    Reply
  6. DecorandtheDog says

    January 3, 2012 at 2:26 am

    Ooooo, this is going to be a fun project…..for me to watch. Probably not so much for you guys. 😛

    Reply
  7. Tiffany @ {Living Savvy} says

    January 3, 2012 at 1:18 pm

    I want to live in your house! I can’t wait to see the finished product! It is going to look fabulous!

    Happy New Year!

    Reply
  8. Lara says

    January 7, 2012 at 1:23 pm

    I just found your blog from Craftaholics Anonymous, and I;m hooked! Your home is beautiful, can’t wait to go find other posts on your progress!

    Reply

Trackbacks

  1. Beam me up - Exposed Beam Ceiling - Directions Not Included says:
    February 20, 2014 at 7:32 am

    […]  We tore down the mess of a ceiling and fans within a week of closing and did some initial work to clean up the ceiling  right […]

    Reply

Leave a Reply Cancel reply

Your email address will not be published. Required fields are marked *

hi there, i’m anna

dnirssyellow dnipinterestyellow dnifacebookyellow dniinstagramyellow AnnaDNI2014 Welcome to Directions Not Included. I'm Anna, the voice behind the blog. I'm a marketer, crafter, DIYer, and lover of wine and sushi. Oh and I love my husband Ray, too. I also seem to be a magnet for scruffy mutts and cats. Want to know more about us and what we are doing? Learn more here.

what we’ve been up to

looking for something?

pinterest addict

Visit Anna [DirectionsNotIncluded]'s profile on Pinterest.

our lovely sponsors

RMPotteryButtonFINAL2AD-Button adad

about

Directions Not Included follows the DIY and craft adventures of two humans, three dogs and two cats as they take one old Florida home and make it theirs.

This blog will feature DIY tips, before and after photos, craft tutorials, home decor trends, and gratuitous pictures of our five rescued furry children.

Copyright 2010 - 2014. Directions Not Included - Anna Cruz-Morales.

The contents of this blog, including text, original photos and ideas are the sole property of the author. If you intend to use my text or images, please link back to my site and credit given to Directions Not Included. Please share only one image and direct readers to my site. A notification email would be greatly appreciated.

like us on facebook

like us on facebook

don’t miss any of the fun

dnirssyellow dnipinterestyellow dnifacebookyellow dniinstagramyellow dnitwitteryellow dnigoogleyellow

subscribe via email

Enter your email address to subscribe to this blog and receive notifications of new posts by email.

Copyright Directions Not Included 2014 * ·Daily Dish Pro Theme * Modified by Directions Not Included * Genesis Framework * by StudioPress * WordPress * Log in