Directions Not Included

DIY and craft adventures of two humans, three dogs and two cats.

  • home
  • about us
  • house tour
    • before & during
    • the afters
  • project gallery
    • renovations
    • furniture & decor
    • holidays
    • events
    • crafts
    • archives
  • featured
  • contact
    • advertise
    • disclosure
    • privacy

the final reveal – refinishing an exposed beam ceiling

February 18, 2014 11 Comments

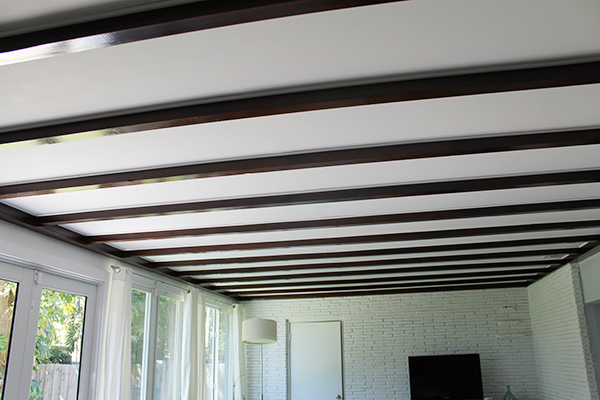
Finally. I  can finally say we are done with this back-breaking and tedious job. It sucked, but it is so worth it. Our exposed beam ceiling has been completely finished! Do a little dance for me. Wrapping this up gets us one step closer to finishing our family room.

Exposed beam ceiling - Directions Not Included

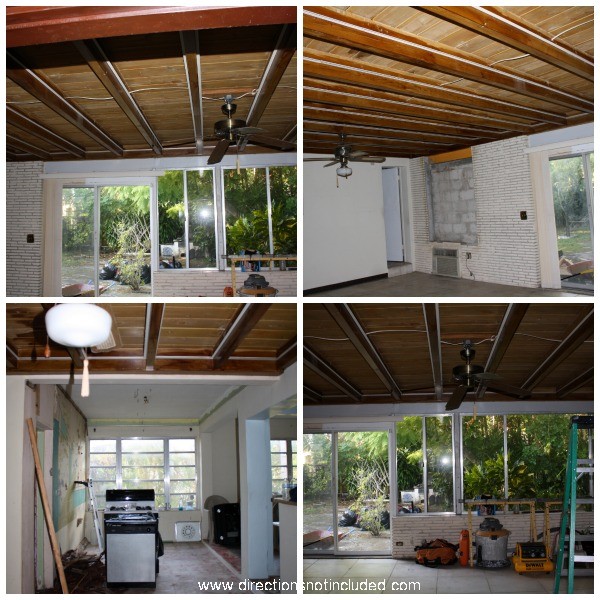
Let me remind you with what we started with. Old orangey stained beams, dropped ceiling tiles with a shoddy electrical throughout, and no insulation. This family room was seriously cringe worthy, but I knew it just needed (and still needs) major elbow grease to make it a dream space.  We tore down the mess of a ceiling and fans within a week of closing and did some initial work to clean up the ceiling  right away.

Exposed Beam Ceiling Before

Exposed Beam Ceiling Before - Directions Not Inluded

The real back-breaking work included insulating and putting up drywall on the whole ceiling to leave the beams exposed. This is an old house. Nothing is even. That meant each area had to be measured and cut to size one by one. Fun. Add re-staining the beams a darker color to match our floors, spackling and painting the dry wall. And if that wasn’t enough, we had  to add a white trim to cover the gaps between the beam and the drywall. Never ending project.

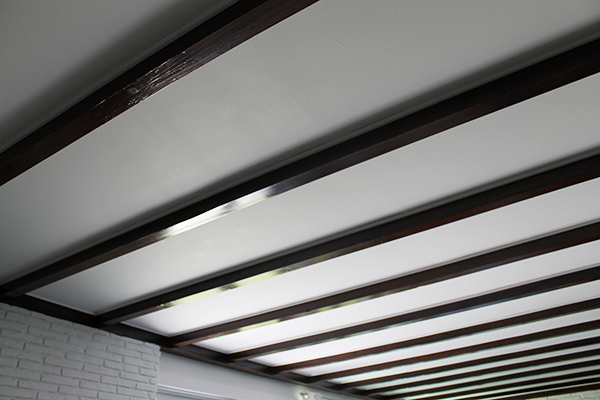
But it is finally done. And what a magnificent difference it makes in the space. The beams match the flooring throughout the house, the crisp white of the ceiling and the walls makes the space probably my favorite in the house.

Exposed_Beam_Ceiling3

Exposed_Beam_Ceiling1


Seriously, when I look at the before pictures I now understand  why my mother-in-law cried when we bought the house. Ray and I knew it had good bones and would be our perfect space but it has taken us some time to get there.

So what do you think of the exposed beam ceiling? We had some people tell us we should have just covered it up and saved ourself the work. That was never an option for us so I’m glad we are finally done!

Anna

you might also like:

the ultimate garage sale score - broyhill brasilia sideboard
changes on the horizon - rethinking the floor plan
this is halloween - knock off pottery barn chalkboard tombstone

Filed Under: home decor, renovations Tagged With: exposed beam ceiling, family room, renovations

About Anna@DirectionsNotIncluded

Hi there! I'm Anna, the voice behind Directions Not Included. I'm a marketer, crafter, DIYer and lover of all things home related. You can usually find me covered in paint, cuddled with one of my pets or in front of a computer or other digital device. Thanks for reading Directions Not Included. I hope you stick around.

Comments

  1. cassie says

    February 18, 2014 at 9:20 am

    WOW! insanely gorgeous. that is all.

    Reply
    • Anna@DirectionsNotIncluded says

      February 20, 2014 at 11:16 am

      Thank you, my friend!

      Reply
  2. Emily@ EAK a House says

    February 18, 2014 at 1:02 pm

    Beautiful! Your hard work was so worth it!

    Reply
    • Anna@DirectionsNotIncluded says

      February 20, 2014 at 11:13 am

      Thanks! 🙂

      Reply
  3. Alison says

    February 18, 2014 at 3:59 pm

    Wow, it looks amazing! We are trying to keep the original features in our house, I think it is worth the extra effort!

    A
    x

    Reply
    • Anna@DirectionsNotIncluded says

      February 20, 2014 at 11:13 am

      Thank you!! 🙂

      Reply
  4. Tiffany says

    February 19, 2014 at 9:50 pm

    It is beautiful! I love it and it was totally worth the work!

    Reply
    • Anna@DirectionsNotIncluded says

      February 20, 2014 at 11:12 am

      Thank you! I’m so glad it is over.

      Reply
  5. caro says

    July 31, 2015 at 3:21 pm

    was just wondering if the insulation helps? I’m thinking of installing insulation in between my exposed beam as well

    Reply
    • Anna@DirectionsNotIncluded says

      August 1, 2015 at 8:46 pm

      Hi Caro, it did make a big difference. The room is cooler now during the summer months and it also helped with the sound too. I’m happy we did it.

      Reply
  6. Lula Porter says

    March 6, 2022 at 2:59 pm

    Dear, your house is so much like mine it isn’t even funny! Good bones. Bad decisions. Mine was cut in half and the second floor roof removed so it could be moved 32 miles in 1999.
    We put a 14.5′ beam across the living room where it was cut and I stole porch flooring to repair where they cut the floor. We added a second floor joist to each ceiling joist in the exposed ceiling and two where a fire had weakened the joist. Then we added a load bearing wall between the living room and the bedroom.
    First, I hate drywall because I live in a hurricane prone area. This house survived a direct hit from Betsy and Katrina before being moved AND Katrina after. Yep, good bones. If I had installed drywall between the joists, yesterday’s sink overflow would have destroyed all my work. I’m 67 and too darn old to do it again!!
    The thing is the upstairs subfloor is double V tongue and groove! I want it to shine as my ceiling. I want to paint the ceiling and the joists a light tan.Then stain the beam dark to match the moulding. Should I hire someone to install linoleum in the upstairs bath and bedrooms? Paint with Flexseal first?

    Reply

Leave a Reply Cancel reply

Your email address will not be published. Required fields are marked *

hi there, i’m anna

dnirssyellow dnipinterestyellow dnifacebookyellow dniinstagramyellow AnnaDNI2014 Welcome to Directions Not Included. I'm Anna, the voice behind the blog. I'm a marketer, crafter, DIYer, and lover of wine and sushi. Oh and I love my husband Ray, too. I also seem to be a magnet for scruffy mutts and cats. Want to know more about us and what we are doing? Learn more here.

what we’ve been up to

looking for something?

pinterest addict

Visit Anna [DirectionsNotIncluded]'s profile on Pinterest.

our lovely sponsors

RMPotteryButtonFINAL2AD-Button adad

about

Directions Not Included follows the DIY and craft adventures of two humans, three dogs and two cats as they take one old Florida home and make it theirs.

This blog will feature DIY tips, before and after photos, craft tutorials, home decor trends, and gratuitous pictures of our five rescued furry children.

Copyright 2010 - 2014. Directions Not Included - Anna Cruz-Morales.

The contents of this blog, including text, original photos and ideas are the sole property of the author. If you intend to use my text or images, please link back to my site and credit given to Directions Not Included. Please share only one image and direct readers to my site. A notification email would be greatly appreciated.

like us on facebook

like us on facebook

don’t miss any of the fun

dnirssyellow dnipinterestyellow dnifacebookyellow dniinstagramyellow dnitwitteryellow dnigoogleyellow

subscribe via email

Enter your email address to subscribe to this blog and receive notifications of new posts by email.

Copyright Directions Not Included 2014 * ·Daily Dish Pro Theme * Modified by Directions Not Included * Genesis Framework * by StudioPress * WordPress * Log in

 
Loading Comments...
Comment
    ×